Across the country, utilities are moving fast to meet lead service line replacement (LSLR)...
Best Practices for Installing and Prepping Underground Copper Service Lines
Over 9 million lead service lines require replacement in the United States, and copper continues to be the preferred replacement material thanks to its impermeability, safety, and sustainability. Copper’s proven track record over decades of use guarantees that it will continue to provide safe drinking water for generations
However, to reap the long-term benefits of copper, it is crucial to follow proper processes and procedures for installing copper service lines.
There are two primary types of copper connections: flared connections and compressed connections. This article details best practices for installing these connections, how to properly prepare an annealed tube to ensure a leak-free joint and maintain the reliability of your copper service lines. Additionally, we will debunk some common myths and address issues encountered in the field.
Prepping an Annealed Tube
Step 1: Cut the Tube to the Desired Length.
Cut the annealed tube to your desired length. After cutting, the inside edges will be sharp and must be deburred.
Step 2: Ream and Deburr the Tube
Ream and deburr the tube using either a pencil or barrel reamer to ensure a smooth finish. Failure to do so can cause system problems years later.
Step 3: Resize the Annealed Tube
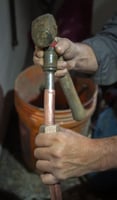
Since an annealed tube is not round, use a sizing tool to resize the tube. When using a sizing tool, one-half of the tool goes into the tube. Because the tube isn’t round, it may be hard to fit the sizing tube, so using a hammer to gently tap it will ensure the tube goes all the way into the sizing tube. Once it’s all the way in and turns freely, the tube will start to resize.
Next, insert the mandrill part of the sizing tool into the same end of the tube. Use a hammer to gently tap it until it “bottoms out” and spins freely. Once you remove the sizing tool, the end of the tube should be perfectly round to make a connection.
Flared Connection
Step 4: Flare the End of the Tube
Use a flaring tool to flare out the end of the annealed tube. For this step, be sure to check the manufacturer’s instructions for your specific flaring tool.
Start by inserting a nut into the annealed tube and then place the tube into the flare tool's appropriate-sized opening.
Place the flaring cone over the pipe, clamp it down to ensure it doesn’t move, and carefully tighten the tool handle to gradually expand the end of the tube into a flare.
After the tube is flared out, the end should align perfectly with the nut, forming a secure fit when connected to a compatible brass piece.
DO NOT use Teflon tape or wax between the mating surfaces of the tube and fitting. Copper is very malleable so it will conform to the brass piece as you tighten it, so there is no need to put any material on the face of the flare and the brass component.
Compression Fitting
When it comes to compression fittings, make sure the tube is properly cleaned, prepped, and resized. As mentioned above, make sure the end is deburred and properly round. This will ensure that there are no leaks or system problems.
Installing Copper Through Foundation Floors or Walls
One proper way to get copper through a foundation wall or floor is a sleeve. When using a sleeve, ensure the copper tube in the sleeve is properly sealed with a Fernco Coupling or electrical duct seal to prevent moisture from getting inside the sleeve. See the diagram below.
Proper Backfilling
The Copper Development Association does not recommend burying a copper service line in an open trench on disturbed soil. To secure proper drainage, a suitable depth of clean soil, pea gravel, or other clean material must be put in the trench before the copper service line can be laid. We have the trench detail below as an example but be sure to refer to the detail in your field from your city for the proper requirements and depth of this material, i.e., be sure to follow the jurisdiction detail of a trench for proper installation on a service line.
Directional/Mole Boring
Another installation of a copper service line is directional boring or mole boring. It’s important to remember that the outside diameter of the existing line must match the outside diameter of the copper service line. Ensure that your copper tube has expansion and contraction allowance within the trench.
Proper installation and preparation of copper tubes are essential to ensure durable, leak-free service lines. By following these best practices for prepping, flared connections, and compression fittings, you can maintain the reliability of your copper systems. Always refer to local guidelines and trusted resources to ensure proper installation. For more information and visuals, please visit copper.org.


